Finding the next elusive trend for Print on Demand can be a time-consuming and frustrating process. Most use the Bubble Trends tool to get a snapshot of the day’s trends on Redbubble then start making shirts if the demand versus availability is reasonable. The thinking (and what most YouTubers will tell you) is that if the phrase “Big Cow” is trending and there are only a few hundred designs showing available on bubble trends, you should drop everything and make shirts with “Big Cow” because that is where the money is. The problem comes when you make your shirts and upload them and the sales just don’t come. What is happening? And if the trends sites aren’t the best place to look for trends then where do you go? Let’s talk about it…

A moment in time

Most of the Redbubble trends tools are a snapshot of what was being searched for at that time. The numbers of available shirts are a bit misleading. You must realize that just like you, everyone else is searching for that next elusive trend to jump on. When the trends tool took the snapshot there may have been only a few hundred designs available, but unless you are there to jump on the new design trends when the next snapshot happens you are going to be behind. By the time you get your design done, how many others will already be available?

The tough truth

Chasing trends is a rough game, especially if you are not a graphic designer. If you use Canva or another service that offers pre-made templates for your Print on Demand designs, the truth is that they all look like the designs everyone else using those services are making. Someone who knows graphic design and does Print on Demand likely has a catalog of originally created assets ready to go. I would venture that they have a few different kinds of cows, maybe funny maybe serious that they can use right away. This designer likely has their own custom templates ready to drop their cow drawing into and all they need to do is add the text and a bit of polish and they will end up with an original custom design that is light years better than the one you created on Canva or on your smartphone. When the customer comes across a design that looks like 20 other people’s or the custom original cow, guess which one is going to sell.

Making sense of it all

The reason you aren’t getting sales from your trend chasing makes total sense if you take a step back. First, you must ask yourself if your designs can stand shoulder to shoulder with the other people that are making the same themed design. When I chase trends, I always make original content (not stolen from google images and not from Canva) instead of just making a text design. Text designs especially for trends are the low-hanging fruit that everyone goes for right away. Second, you need to ask yourself if the trend you are chasing or creating designs for is going to still be a thing by the time your design launches on the sites. If you are jumping on trends too late this could also be why you aren’t seeing the sales you want. If the YouTuber you watch does a weekly trends video on Monday but you don’t watch it until Wednesday night, how many designs are already available for that trend, and will the one you create on Canva be better than the ones being created by graphic designers? Think of trends like a crowded pool, if the pool is going to be open on Sunday and you arrive way later in the afternoon it is going to be very crowded and difficult to be able to swim and enjoy yourself. If you wait until everyone goes home for the day, you are going to get some time to yourself in the pool but it will be closing before you get a good swim in. Does that make sense?

Finding good trends

The harder something is to do, the more rewarding it can be. Using the Bubble Trends tool will give you a snapshot of trends from Redbubble, but something like Google Trends will give you more granular data that you can use to look at trends on Google, which will translate into trends for Print on Demand – but it will be more work than going to one website and having the information spoon-fed to you.  A good source of trend data is Merch Titans or just looking around on Amazon. Keeping a close eye on trending topics on social media services like Twitter is also a good place to start, but again, it will be more work than just clicking a trends tool. Soon we will have a full review of Merch Titans and Google Trend for Print on Demand users, so stay tuned!

Conclusion

Did you find the information in this article useful? Support us by sharing this and other articles on this site to your Print on Demand forums. We can’t monetize our content because we use copyrighted words, so we rely on our readers to share our content to support us.

Get out and get designing!

Getting those first sales can be difficult. If you frequent Facebook or Reddit forums geared towards sharing your work, you might be saddened by everyone boasting about all the sales they are getting, but you are seeing very few if any. Do visitor numbers matter? Do you get traffic on your Print on Demand shop but no sales? Do you have hundreds upon hundreds of people favoriting your art but no sales? Traffic, visitors, and favorites can be difficult to understand so let’s talk about it…

Traffic

There are three distinct sources for traffic headed to your Print on Demand store. In the case of Redbubble, or Teepublic, they will start promoting your work right away. If you are using Teespring then you have to fulfill the requirement s of their trust score (by getting a few sales via direct promotion or direct marketing) before they will start promoting your work. Traffic types include:

Site traffic

Redbubble, Teepublic, or Teespring market your work more as it sells better. The more you sell the higher your work will rank in the pages when a customer searches the site. Your work can appear in their email advertisements, blog posts, or direct ad sales on sites like Facebook. This one is pretty simple – the more you sell the more they promote you and the more you sell.

Direct customer engagement

This is where you promote your work on Facebook, Twitter, Reddit, Instagram, or direct email. The user clicks the link you provide with your advertising material and is taken to your shop. This is where you are going to get your biggest number of sales right away. The more you promote your work the more you will drive direct customers to your shop. Finding good places, good hashtags and niche forums to advertise your work should be a good portion of your time spent on marketing your products. Do remember that there is a fine line between advertising and spamming. Putting an ad for a cool new design in your favorite yoga forum is good, but flooding the forums with all the products that your cool new yoga design is available on is spammy and will make most people tune you out or worse cause them to complain to the forum admins about your poor advertising practices. Good engagement, and mentioning your wares when you can will go a longer way than carpet bombing the forums with images and links to the same or similar products that you are selling.  

Organic Traffic

When you fill out those description boxes or add tags to your work, the search engines like Google, Yahoo, and Bing crawl it and use that information to generate results that a user can click on when they search for a specific topic. Remember that the bigger the niche you are in, the less likely a user is to see your designs. If a user searches for funny yoga shirts how many results will come up and how likely are you to be in the top few pages? A lot and not likely. This is where specific descriptions are going to pay off. If a user searches for funny yoga shirts with cats meditating, and you have those keywords in your description or tags then you are much more likely to get a successful search result. Just make sure you are using truthful and relevant tags for your work. You can get more traffic to your designs by adding tags that are copyrighted but Redbubble and other sites will quickly delete your design for inaccurate tags or remove the offending tags from your listing. Be responsible with your tags and not spammy. 

Consider the source

Now you know where you are getting your traffic, let’s talk about the kinds of traffic. If you are targeting people interested in yoga and you are a member of a yoga forum, that is a great place to talk about and share your work.  As mentioned earlier, engagement with the community, talking with people and answering questions, etc. can give you opportunities to mention or show your work which feels a lot less spammy than flooding the forum with photos of your cool new design.

If you frequent Facebook and Reddit sharing groups, where artists talk about and share their work, you can get a lot of sharing traffic but not buying traffic. I have talked to so many people struggling with their shops that have hundreds or thousands of likes and followers but only a few sales. This means that that person is doing a good job of marketing, but not a good job of directing that marketing effort. If you are in sharing groups with other artists, I hate to be the one to break the bad news to you, but most of those people are trying to sell their work too, not buy yours. Favorites don’t go a long way to getting sales if they are just from people who are looking to get you to favorite their work too.  You can have a million followers, but if they are all followers that are looking o get sales not people who are interested in your work then you might be starting to realize where your problem lies.

Data Matters

If you are relying on the website (like Redbubble) to give you the data you need to figure out why you aren’t seeing sales, you are missing out on part of the equation. You will see where the traffic came from and how that translated to sales, but what if you could see what the user was searching for when they found your designs? What if you knew how many times the user was shown your content before they clicked on it (impressions versus clicks) This is where Google Analytics comes in. Now, I’m not going to reinvent the wheel here, there are a million and one tutorials to get Google Analytics setup with your Print on Demand shop, so just do a Google or Youtube search. It is very easy, takes only a few minutes, and the data you will get will be much more interesting and informative than the culled data you get from the Print on Demand sites. Most sites like Redbubble just need the tracking ID that Google gives you when you go to www.google.com/analytics (it looks like UA-733458177-1) Once you have your analytics account setup and make a property you just need to paste it into the tracking section of your account on Redbubble. Its super easy.

Losing Traffic

If you had good traffic and sales but have recently noticed a drop off in customers, where you are sharing your work might be the culprit. If you spend a lot of time in the Redbubble and other print on demand sharing sites on Facebook people might be “borrowing” your ideas. Thievery in Print on Demand is rampant and there are no safeguards other than copyrighting all of your work before you post it. Many times that can be expensive ($65.00 per copyright submission of 750 images), and even then most of the stealing happens with sellers that are not in the United States and therefore not applicable to our copyright laws. If you have found your traffic taking a hit, consider doing a reverse google image lookup on some of your more popular designs. Just right-click the image on your proint on demand site and choose look up image on google (in the Chrome browser). Google will find instances of your shirt design and you can see if people have pilfered your work.   

Conclusion

Make sure you are focusing your marketing efforts on the right place online, and make sure you have all the data you can get to make informed decisions about the work you are putting into marketing your work online. At the end of the day, you can have a million followers and likes, but if they all come from people who aren’t going to buy your stuff it is useless. Most customers don’t look at likes and followers before they buy, they see a shirt or product they like with your design and they buy it.

Did you find this information useful? Drop me a message and let me know. Because of the trademarked names in many of my articles, I can’t use ads or monetize it so sharing this content with other print on demand artists help me to keep this site going and provide content like this.

Get out there and get designing!

One of the best ways to get sales on any print on demand design starts with finding effective keywords. There are two schools of thought on how to use keywords in your listings: 1. Find relevant keywords that will drive buyers to your design and 2. Use popular trending keywords (even when they don’t fit the description of your design). Which is the best approach and are there risks associated with either method?

Where to start

With the margins for print on demand sales so thin, I always prefer free solutions to paid ones, and besides who doesn’t like free right? I recommend two services which are (as of this writing) free to use. They will require an email or free account signup. This can be easily sorted by just making a new Gmail account for your print on demand business if you haven’t already.

Merchtitans

My go-to is the merchtitans.com keyword finder for Redbubble, it can be found here. Merchtitans does a good job of scraping the data from Redbubble listings when you type in your keyword or phrase. Merchtitans will collate a list of words and show you how many times they appear on Redbubble. Click the format and copy tags and it will present you with a list that is ready to be pasted into your listing.


 KWFinder

This one will require an email as well. You get only a few searches a day and in most cases, you only get the first five or so results. I consider this a decent resource, but to get the most out of this one you need a paid account. I have found that the results from KWFinder are fairly close to the ones that come from Google Adwords (which I will be doing an article on in an upcoming post.)

Relevant keywords

If you have a picture of a bear drinking coffee on the design you are listing, the relevant keywords would be bear, coffee and drinking. From there, consider using descriptors of the items in your design. Coffee cup, coffee mug, grizzly bear, cute bear, teddy bear, blue mug etc. Don’t forget words like cute, adorable and the like.  Clear use of keywords can get you far and most importantly keep your design from being removed from Redbubble and other sites which use keywords. Some of the best-selling products on these sites use a few clear keywords to describe the design instead of a million useless words.

Trending keywords

The other school of thought is to add keywords that are trending in the news and other media. The thinking is that when a buyer searched for these keywords on Google or other search engine, your design will come up and you will get your design in front of more eyes. In practice, adding irrelevant keywords or words containing celebrity names or other properties generally get you listed lower in the rankings when the customer searches for similar keywords to the ones in your listing.  The automatic algorithms are also much more likely to flag or take your design down if you use these type of trending keywords.

Order matters

Algorithms change, and as of this writing, the sites like Redbubble that use keywords give more weight to the keywords that appear first in the listing. Fewer keywords also put more weight or emphasis on the words used. This also goes for Merch by Amazon so use your most important keywords in your first description boxes. 

How many keywords?

Just because sites like Redbubble allow you to use more than 20 keywords doesn’t necessarily mean you should use more than 20 keywords. I generally to keep my word count under 15. Put the relevant ones up front in the listing and then use them in your description. This will add even more weight to these words. Do words like best-selling top-selling and others help? Not as much as you would think. There are a lot of people listing designs every day and how many of those people do you think are using words like best-selling and top-selling? Those words become less weighty when a lot of people use them. You have to come up with words for your design that are unique to your design.

Conclusion

What do you think? did this article help you? then help me out by sharing this article with your print on demand forums and on social media.

Now get out there and get designing!

Print on Demand (or PoD) is considered a passive source of income and is an internet-based business anyone can start. When most people talk about Print on Demand, they are generally referring to a company online which prints T-shirts for you, however today’s print on demand services offer everything from face masks to phone cases and beach towels. Essentially you create a high-resolution design and upload it to a service, depending on the service you choose to partner with, they will promote, print, and ship the order to your customers. You get a percentage for each sale and most services allow you to choose the amount you make on each item sold. This lets you focus your time on creating new sellable designs rather than dealing with business infrastructure. How does it work? Let’s talk about it.

How much does it cost?

Getting started in any business requires startup costs. Depending on the path you take, your startup cost for getting into Print on Demand can be very reasonable. All but a couple of the Print on Demand services are free to join, but you might be required to jump through a few hoops to get your items listed.  Until now, if you wanted to be able to make your own T-shirts to sell, you had to learn screen printing and buy the bulky equipment and all the blank shirts and inks. You had to buy into a credit card service and deal with the hassle of not only promoting your designs, but printing and sending them out to your customers yourself. With Print on Demand services, you just upload a high quality, high resolution file and they handle the rest. But what about the most important part of the equation? The designs?

If you don’t have a background in graphic design, color theory and typography, can you still make designs for Print on Demand? Of course, there are websites like  Canva.com  that allow you to create designs from templates, all you need to do is come up with the text you want to put on the shirt. Here is where most Print on Demand tutorials end – they don’t tell you the truth. You can use these design templates, but there will be many times when you want to make specific changes to a design to fit your needs for a shirt design, and having a background or at least some basic knowledge in graphic design can go a long way.

The most significant cost associated with starting a Print on Demand will be time. No matter how simple all of the other tutorials say it will be, there will be significant time involved in getting your business up and running, then you will spend a ton of time researching new niches for shirt designs, promoting your work and uploading your completed designs to your shop. There are automation services which streamline the process for you but be prepared to pay a monthly charge.

What you need

First and foremost (other than an internet connection) you are going to need a computer or tablet that can create designs for your Print on Demand shop. You will also need software to create your new designs on, there are free options available like GIMP, but I prefer Photoshop over all other programs because there is so much information available online to learn the program. All the best plugins, and content is created with Photoshop in mind, and I can’t see a viable reason to not use Photoshop for creating designs. My thinking is that you can get a free program like GIMP and try to translate tutorials and lessons to that platform, but learning new software can be difficult enough without having to add in a translation errors when you already don’t feel comfortable with the program.

Photoshop used to cost hundreds of dollars and needed to be upgraded each year. These days, you can get photoshop in the photographer bundle for $9.99 a month, less than the price of a cup of coffee. This will give you access to all the cool new features in photoshop and it is constantly updated. In the photographer bundle you also get Lightroom which is a great program to catalog and edit all your photos. We aren’t affiliated with Adobe, and get nothing for recommending photoshop to you, it is just the best program to use for design creation hands down.

You will also want a backup strategy for your designs. You are investing time into your designs, and a computer crash could completely derail your business if you don’t put a plan in place form the outset. 1 Terabyte dries ca be had at any big box store for less than a hundred dollars – often way under a hundred dollars. Back up your work often, believe me the first time you have a computer crash you are going to thank me.

Lastly, you are going to need your tax information. When you sell something online you must pay taxes on it, there is no way around it. Most Print on Demand services will ask for your social security number and will give you itemized comma separated lists of the items you sold over the year so you can claim them on your taxes.

If you are serious about starting your Print on Demand business, I highly recommend that you consider setting up a LLC. I’m not a lawyer and don’t consider this legal advice, but a LLC will protect your personal assets in the event that someone sues you over a design. Whether you are making shirt designs, jewelry or looking at a career in photography a LLC can be a lifesaver (and property saver). Again, I’m not a lawyer and this isn’t legal advice but Legalzoom.com is a great place to get a LLC setup for around $300.

Set yourself apart

Since COVID-19 hit the Print on Demand industry has exploded with new designers. Some have come and gone, others are still hanging on. With the field so crowded, you as a designer need to set yourself apart from the herd. When you use services like Canva.com to create your designs, you must realize that your work is going to look like other’s work. You can’t get around this and no matter how many different templates are available, customers are going to see the same shirt template all over the place. How do you set yourself apart from all the other designers? I am a bit proponent for learning new skills. Rather than just replaying on pre-made templates, why not take the time to learn how to make the designs yourself? This will open all sorts of new avenues for you. Consider this, if you know how to make the templates you could not only create your own designs to sell, but you can also create designs to sell to other designers who don’t have the design skills.

Is it worth it?

The revenue you are going to see (especially at first) from a Print on Demand shop isn’t going to pay the rent, and in most cases, it might not even buy you lunch. Print on Demand is a very crowded market and there is no get rich quick scheme. Just like any business, it is going to take time to research your designs, find new trends to create designs for and upload your designs. The margins you make are razor thin and you will rely on volume to start seeing a reasonable income on a monthly basis. If you have time, and you love to create things that other people can enjoy, then Print on Demand is right for you. I love to make the designs, but even to this day years later I still find myself buying a lot of my designs and wearing them every day. The joy of someone telling you that they love your shirt and you being able to hand them a card and saying I made this is priceless. For me, the time involved in Print on Demand as a business is well worth it.

Copyrighted material

Any “what is Print on Demand” article should include a bit about copyrighted materials. If you have questions about the legality of using the Nike logo, or Baby Yoda in your designs, we have detailed explanations here. For now, the best piece of advice I can give about copyrighted materials is this: If you didn’t create it don’t use it. Drawing Baby Yoda is not creating it. You must produce the design or idea and then implement it to be able to legally use it on your designs. If you venture into the copyrighted materials game be aware that the best thing that can happen to you is your account gets banned or they just take your design down. If you make that shirt with Baby Yoda and it sells well, Disney is going to come after you. Larger companies like this have teams of lawyers that do nothing all day but look for instances of people using their intellectual property and suing them.

Using copyrighted materials in your designs can be a way to get some quick sales, but the hassle and litigation surrounding the use of copyrighted materials is not worth the risk in my eyes.

Print on Demand services

There are a ton of Print on Demand services, but three stand out – Redbubble, Teespring and Merch by Amazon. These three services all use the same base file resolutions 4500X5400 and all three are non-exclusive, meaning when you create a design you can upload it to all three of these services to sell. Let’s break down a quick summary of each of these services:
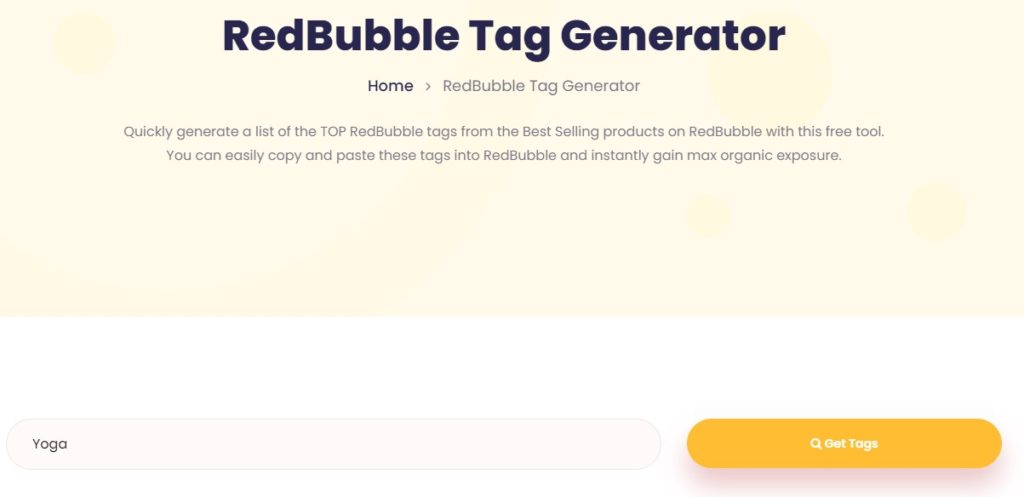
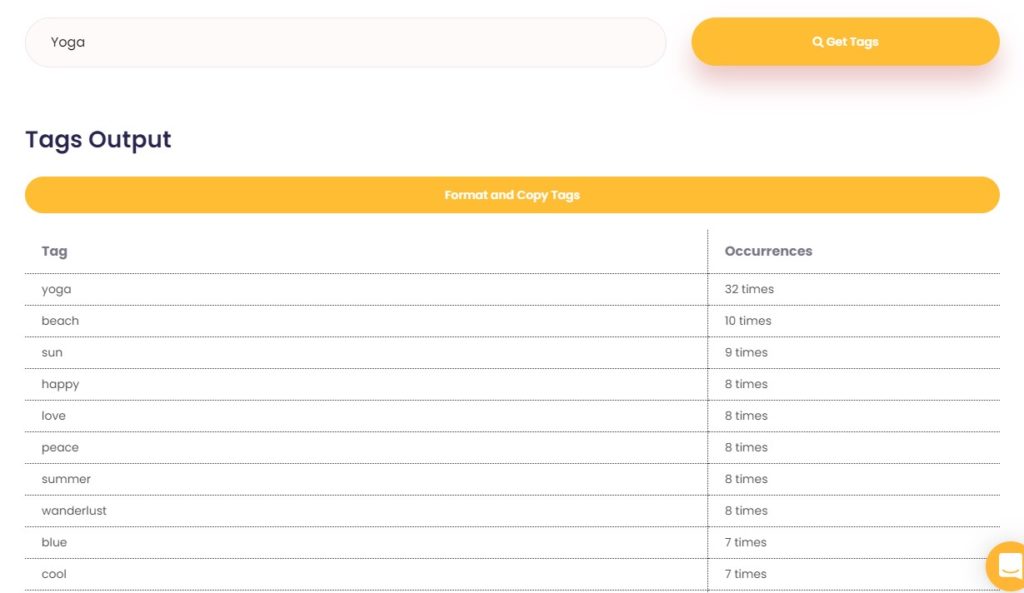
Redbubble

When you are first starting out, Redbubble is going to be your best source of income. The process of uploading your design and choosing the products it will appear on is quick and easy. You can choose your profit margin and once your design is uploaded it will propagate through Google and the Redbubble service. They will immediately start including you into relevant searches and customers will be able to start finding your designs right away. Redbubble is stringent on enforcement of copyrighted materials, so if you upload something you don’t have the rights to use, they will catch you and remove the design. Multiple infractions will lead to a banned account. If you are going to just choose one Print on Demand service to work with, Redbubble will be the quickest and easiest to get up and running. They are a great way to dip your toe into the Print on Demand game and see if it is right for you.

Merch by Amazon

Did you know Amazon has a Print on Demand service? The shirts are decent quality, and they promote your work on Amazon. This is good and bad, good that it is Amazon and your products will be promoted where everyone is already shopping, but bad in that Amazon is so bug your work can get lost in the myriad of other designs available on the service. You also have to apply for a seller account and prove that your work is good. Once you are in you work your way up through a tier system starting at 10 design slots available. After your designs sell 10 shirts you move to Tier 2 whish has 25 design slots. Getting to the point where you can add a reasonable amount of designs onto your account can take quite a few months depending on your designs.

Teespring

Teespring has a metric called a trust score that you are required to navigate before they begin adding your designs into relevant customer searches. This means if you add 25 designs featuring dogs, your work will not be shown to customers searching for dogs until you have sold a few items and met the first tier of trust score requirements. The royalties are good on Teespring, and at the end of the day it is well worth the hoops you have to jump through to get a few sales to start your account. Use Twitter and Instagram to promote your work and get a few sales and you will be all good.

Big note: Teespring’s trust score is there to keep people from uploading and selling copyrighted materials, Don’t even think about uploading your fan art of Baby Yoda, your design will get taken down,  and your trust score will go into negative territory meaning you have to make even more sales on your own before your work starts showing up in relevant searches on the site.

Will you make a lot of money?

It depends. If you are using pre-made templates, and your work looks like everyone else’s, you might not. If you make create fun designs that people want, then you should do well.  Customers want fun topical and interesting designs.  

Give it a shot

Give Print on Demand a try. Don’t give up until you have at least 100 designs up. Once you reach 100 designs, you can take a step back and breath for a minute. Give it some time, depending on the time of year sales can be slow. Towards the holidays sales are always better, consider this as a long-term passive income source. That doesn’t mean to put up a bunch of designs and walk away, rather take the time for that big initial push to get 100 designs then evaluate where you are. Look at the designs that are selling and the ones that aren’t. Trends change, people’s taste change and your skills improve. Once you hit 100 designs I guarantee that you will look back and wrinkle your nose at some of the early designs you created.

Print on Demand is a fun and rewarding source of passive income. It is cheap to get started as it only costs you time at the outset. Go into it with an open mind and see if what interests you and drives your creation sells.

If you are creating T-shirt designs and you are looking for some inspiration, each week we review the Print on Demand top Niches. Keeping track of what is hot and what is not is a tough process, hopefully this information will help you out.

This week we are transitioning away from Halloween, because regardless of which PoD service you work with your customers will not have time to order shirts or other items and have them arrive before Halloween which is next weekend. By now, you should have your Thanksgiving designs up for sale, and be actively working toward Christmas and New Years designs. Speaking of Christmas and New years, let’s talk about this week niche suggestions.

2020 Sucks

With COVID-19, lots have had a tough year and they are looking to show off their dislike of the year from hell. 2020 sucks shirts are still selling well, you should consider creating some designs which feature 2020 sucks somewhere. Perhaps marrying 2020 sucks with Thanksgiving, New Years or Christmas somehow would yield good results. If this works for you, let us know with a tweet or message!

I may be old but I got to see all the cool bands.

Look it up on Amazon or Redbubble, it’s the words with a guitar. This is a shirt that can seel anytime of the year, so consider this as one of those long-term designs for your shop. Do be careful of the guitars, don’t just go on Google Images and grab a vector or image of a Fender or other guitar, copyright police will come for you and make them take your  design down.

Kayaking gets me wet and SUP

Its strange, but the Kayaking gets me wet design is doing well this week and last. I have also seen Stand Up Paddling gets me wet designs out there quite a bit. This is also called SUP. It seems early for summer sports, but hey, if it is selling why not? Have you tried this niche? How is it working for you?

Merry Quarantine Christmas

Christmas designs are starting to fill up the stores and they are selling well. From what I have seen so far, it los like lots of the larger shops are re-tooling their designs from last year and adding Merry Quarantine Christmas to them.  Many are also incorporating toilet paper rolls into the 2020 zeros. I have also seen lots of elves with 2020 toilet-paper-ized.  

Voting is hot 2020

We are at the end of the election season, you should have your Biden won and Trump won themed shirts in your stores (if you are playing both sides of the fence).  Redbubble is showing trends for Coting is Hot 2020 at the moment, it’s a bit late to jump on this trend but who knows if you have an original design it might be worth it. I still think that designs featuring both candidates for winning the election will be a good seller right after the election. Just put both up and whichever candidate wins the election pull the loser’s shirts down.

Did any of this help you? Did we inspire you? Let us know if you like this series we will keep it going each week. Now get out there and get designing!


Get yours here: Travel Duffel Bag Waterproof Canvas Overnight Bag Leather Weekend Oversized Carryon Handbag Brown

Duffel bags are so great for weekend or overnight travel. Here at Epic Shit we get a ton of travel bags to review and almost never post reviews because they tend to be cheap and fall apart easily. With that im mind, enter the Travel Duffel Bag Waterproof Canvas Overnight bag from NEWHEY. I love a duffel bag that is roomy and has enough space for all my stuff for a weekend getaway, but still has pockets I can place harder to find things like my cellphone charger. How does this 46-dollar Duffel stand up to road trips, plane trips and weekend getaways? Read on…

Size matters

The most important features of a Duffel bag are the size and the construction. I have had Duffels bags that were just too big and once they were filled the handles felt like they were going to rip off. I would put this Duffel Bag squarely in the middle size range with dimensions of 22.83(L) by 11.8(W) and 11.8(H),   the included shoulder strap expands from 27.9”–52′.  When I think about Duffle Bag size, I consider smaller than this bag suitable for the gym, and larger than this more for a week-long trip. This bag holds enough clothing and supplies for a 2-3 day weekend trip or business overnighter. I consider this the perfect size for a grab and go over even a weekend roller suitcase. Before we got this, my wife used a weekend size Samsonite roller. Nice she saw the quality of this bag, she bought one for herself. They are great to stuff with clothes and toiletries and throw in the car for a getaway. The interior pockets keep stuff organized so you don’t have to dig around in the bottom looking for loose items like with other bags.

Construction

This is where I was really shocked. I expected a 46-dollar bag to be cheap, but this feels like a much more expensive bag. This Travel Duffel Bag is made of High-density waterproof canvas and has nicely rounded comfortable to hold leather handles. The stitching all around is top notch and it had four metal feet. The zippers are heavy duty and I have yet to have any issues with them even when my bag was stuffed to capacity. I love that the canvas is waterproof, we tested this on our first outing last year. When we arrived at our hotel, it stated pouring and even after sitting in the rain for a few minutes all the clothing inside was still bone dry. I doubt the bag could handle being submerged of course but for the testing and rain exposure I have thrown at this top rated cheap little bag I am very impressed.

The bags come in a few different colors, brown and grey as well as camo patterns.  

User experience

I have been using this bag for nearly a year now. I have stuffed it full and thrown it in the back of the car, stuffed it full and carried it on top of my suitcase on a cross country flight and left it sitting in the rain while I checked into a hotel in the mountains. With all the wear and tear this bag has endured I would expect to see a lot more fraying on the edges or stitching, but I am so far extremely happy with the quality and build of this Travel Duffel Bag.  I have to say I really love this little bag.

Conclusion

I’m shocked at the quality of this bag for the price. I’m happy to recommend this to anyone looking for a nice medium, size Travel Duffle Bag that can easily hold enough clothing and supplies for a weekend getaway or short business trip. The handles are comfortable, and the shoulder strap doesn’t dig into your neck when you are carrying it fully loaded. This bag really feels like a great alternative to a more expensive piece of luggage. I own two of them and am strongly considering these as Christmas presents this year for friends and family. Great bag, great value.

I love to hear from my readers! If you have questions about this or any review on this site, or If you have a product you would like us to review, drop me a message on Twitter or on the contact form here on the website. Have a great day!

Twitter: @EpicShit9

Colors and styles


Get yours here: Canon RC-6 camera remote

If you are a Canon camera user like I am, and you want to take self portraits there are two ways, via your phone and the Canon app or the Canon RC-6 remote. Amazon does sell an alternative remote under their Amazon Basics label, but I have found that to be a bit finicky even though it is half the price. The Amazon Basics remote also does not work with every Canon camera the RC-6 does. So, is the RC-6 worth 20 dollars just to remotely trigger your camera? Short answer – yes!

Compatibility

I hope that with this review I can shed some light on the operation and compatibility of this unit. Many online reviews for this unit do not spend any time on the compatibility of the RC-6 remote, therefore you are left wondering if it will work with your model of camera before you buy. From the Canon official site, these are the camera bodies this unit will work with:

— EOS Rebel T7i Body Refurbished
— EOS 5D Mark IV Body with Canon Log
— EOS Rebel T3i Body Refurbished
— EOS 5DS Body
— EOS 80D EF-S 18-135mm f/3.5-5.6 IS USM Lens Kit
— EOS Rebel T2i EF-S 18-55mm IS II Lens Kit
— EOS 5DS R Body
— EOS Rebel T7i Body
— EOS 6D Body Refurbished
— EOS Rebel T7i EF-S 18-55mm f/4-5.6 IS STM Lens Kit
— EOS M100 EF-M 15-45mm f/3.5-6.3 IS STM Lens Kit Black
— EOS M100 EF-M 15-45mm f/3.5-6.3 IS STM & EF-M 55-200mm f/4.5-6.3 IS STM Bundle Black
— EOS Rebel SL1 with EF-S 18-55mm f/3.5-5.6 IS STM Lens Kit White Refurbished
— EOS 7D Mark II Body Wi-Fi Adapter Kit
— EOS M100 EF-M 15-45mm f/3.5-6.3 IS STM Lens Kit White
— EOS M6 Body Black
— EOS 7D Mark II EF-S 18-135mm f/3.5-5.6 IS USM Wi-Fi Adapter Lens Kit
— EOS 6D Mark II Body Refurbished
— EOS 5D Mark IV Body
— EOS 5D Mark IV EF 24-105mm f/4L IS II USM Lens Kit
— EOS M5 EF-M 18-150mm f/3.5-6.3 IS STM Lens Kit
— EOS 80D Body
— EOS Rebel T5i 18-135mm IS STM Lens Kit Refurbished
— EOS Rebel SL1 EF-S 18-55mm f/3.5-5.6 IS STM Lens Kit White
— EOS Rebel T5i 18-55mm IS STM Lens Kit Refurbished
— EOS Rebel T5i Body Refurbished
— EOS Rebel T7i EF-S 18-135mm f/3.5-5.6 IS STM Lens Kit
— EOS 77D Body
— EOS 77D EF-S 18-55mm f/4-5.6 IS STM Lens Kit
— EOS M6 EF-M 15-45mm f/3.5-6.3 IS STM Lens Kit Black
— EOS Rebel T7i Video Creator Kit
— EOS 77D EF-S 18-135mm f/3.5-5.6 IS USM Lens Kit
— EOS M6 EF-M 18-150mm f/3.5-6.3 IS STM Lens Kit Black
— EOS M6 Video Creator Kit
— EOS M6 EF-M 15-45mm f/3.5-6.3 & EF-M 55-200mm f/4.5-6.3 IS STM Bundle Black
— EOS 60D EF-S 18-135mm f/3.5-5.6 IS Lens Kit
— EOS 60D Body
— EOS M6 Body Silver
— EOS 5D Mark IV EF 24-70mm f/4L IS USM Lens Kit
— EOS 60D EF-S 18-200mm IS Lens Kit
— EOS M6 EF-M 15-45mm f/3.5-6.3 IS STM Lens Kit Silver
— EOS M5 EF-M 15-45mm f/3.5-6.3 IS STM Lens Kit
— EOS Rebel T2i Body Refurbished
— EOS M5 Body
— EOS Rebel T2i EF-S 18-55mm IS Lens Kit Refurbished
— EOS Rebel SL1 Body Refurbished
— EOS Rebel SL1 with EF-S 18-55mm f/3.5-5.6 IS STM Lens Kit Black Refurbished
— EOS 5DS R Body Refurbished
— EOS 5DS Body Refurbished
— Refurbished EOS Rebel T6s Body
— EOS M6 EF-M 18-150mm f/3.5-6.3 IS STM Lens Kit Silver
— EOS Rebel T5i Body
— EOS M6 EF-M 15-45mm f/3.5-6.3 & EF-M 55-200mm f/4.5-6.3 IS STM Bundle Silver
— EOS Rebel SL1 Body
— EOS 60Da Body
— EOS 5D Mark IV Body Refurbished
— EOS 5D Mark III Body
— EOS Rebel T4i 18-135mm IS STM Lens Kit Refurbished
— EOS 60Da Body Refurbished
— EOS Rebel T6s EF-S 18-135mm f/3.5-5.6 IS STM Kit Refurbished
— EOS Rebel T6i Body Refurbished
— EOS 5D Mark III EF 24-70mm f/4L IS USM Lens Kit
— EOS Rebel T6i EF-S 18-55mm f/3.5-5.6 IS STM Kit Refurbished
— EOS Rebel T6i EF-S 18-135mm f/3.5-5.6 IS STM Kit Refurbished
— EOS 6D Mark II Body
— EOS 70D EF-S 18-135mm IS STM Lens Kit Refurbished
— EOS 6D Mark II EF 24-105mm f/4L IS II USM Kit
— EOS 70D EF-S 18-55mm IS STM Lens Kit Refurbished
— EOS Rebel T5i 18-55mm f/3.5-5.6 IS STM Lens Kit
— EOS 6D Mark II EF 24-105mm F3.5-5.6 IS STM
— EOS Rebel T5i EF-S 18-135mm f/3.5-5.6 IS STM Lens Kit
— Refurbished EOS 70D Body
— EOS Rebel SL1 EF-S 18-55mm f/3.5-5.6 IS STM Lens Kit
— EOS 70D EF-S 18-55mm f/3.5-5.6 IS STM Lens Kit
— EOS Rebel T4i Body
— EOS Rebel T4i 18-55mm IS II Lens Kit Refurbished
— EOS 7D Mark II Body Refurbished
— EOS 70D EF-S 18-135mm f/3.5-5.6 IS STM Lens Kit
— EOS Rebel T3i Body
— EOS M3 Body Refurbished
— EOS M3 EF-M 18-55mm IS STM Kit Black Refurbished
— EOS 7D Mark II EF-S 18-135mm IS STM Lens Kit Refurbished
— EOS 6D Body
— EOS 6D EF 24-105mm f/4L IS USM Lens Kit
— EOS 7D EF-S 18-135mm IS Lens Kit
— EOS Rebel T3i EF-S 18-55mm f/3.5-5.6 IS II Lens Kit
— EOS 5D Mark III Body Refurbished
— EOS 5D Mark III EF 24-105mm f/4L IS USM Lens Kit
— EOS M3 EF-M 18-55mm IS STM Kit White Refurbished
— EOS Rebel T4i Body Refurbished
— EOS Rebel T2i EF-S 18-55mm IS II Lens Kit
— EOS 7D EF 28-135mm IS Lens Kit
— EOS Rebel T2i Body
— EOS 7D Body
— EOS M3 EF-M 18-55mm IS STM & EF-M 55-200mm STM Lens Kit Refurbished
— EOS 60D EF-S 18-135mm IS Lens Kit Refurbished
— EOS Rebel T1i Body Refurbished
— EOS 60D Body Refurbished
— EOS Rebel T3i Body
— EOS Rebel T7i EF-S 18-135 IS STM Kit Refurbished
— EOS Rebel T3i EF-S 18-55mm IS II Lens Kit Refurbished
— EOS Rebel T7i EF-S 18-55 IS STM Kit Refurbished

It is a huge list, and hopefully should clear up any compatibility concerns you might have. If your camera is on the list, you are good to go.

Operation

In your camera settings (not on the remote), for most models you have a timer option which can be set between 2 and ten seconds depending on the model of your camera body. I have the 7D mark II and the 5D Mark III and IV and they all have two and ten second timer settings. Set up your camera on a tripod pointing toward you and point the remote at the camera, press the button and the camera will focus and trigger the shutter. This is more for photographers wanting to be in the frame, or for photographers of kids who will be near their subject to coax a smile then press the shutter.  I personally like the single button operation.

Is the RC-6 better than the Canon app? The app gives you access to more of your camera’s operation, but sometimes all you need to do is trigger the shutter. With the app you have to connect to the camera via wi-fi or bluetooth (if your camera has wi-fi connectivity) and often you will lose connection. The RC-6 is simple one button operation. 

Bulb Mode

If you are into long exposure photography or light painting this is perfect, it works with the bulb mode. Set your camera on bulb mode then click once to open the shutter and a second time to close it – no need to touch your camera.

Conclusion

The top rated Canon RC-6 is a great little cheap and simple remote, which allows you to be in the frame of your shot or to trigger your camera for long exposures without jostling the camera around causing blur. I always have this remote in my bag since it is so small. I would order a second battery once your unit arrives so that you have one in your bag. I find that if I don’t use my remote for long periods of time the battery will die as you would expect. Happy Shooting!

 I love to hear from my readers! If you have questions about this or any review on this site, or If you have a product you would like us to review, drop me a message on Twitter or on the contact form here on the website. Have a great day!

Twitter: @EpicShit9


 Get yours here: Altura Photo Professional Rain Cover for Canon Nikon Sony DSLR Mirrorless Cameras

I ordered my Altura Photo Professional Rain Cover Protector for DSLR Cameras about a year ago and wanted to try it in several different conditions before writing this review. So far, I have used the cover in rain, snow, and blowing sand and it performed flawlessly keeping my camera dry and free of debris through the toughest downpour.  When I bought this camera cover, Amazon had it top rated and I can see why, it works very well.

A raincoat for your camera

I shoot with a Canon 5D mark IV, and often use the 70-200 f2,8 IS II with this rain cover. It is difficult to get too excited about a rain cover because it either does the job and keeps your camera dry or it does not. My camera(s) is/are weather sealed, but I use this rain cover out of an abundance of caution. My backup cameras are Canon 5d mark III and Canon 7D mark II, all my cameras fit perfectly (though snugly) in the Altura Photo Professional Rain Cover. I like the drawstrings for extra security over some of the cheaper alternative brands. When you are out in the elements, especially the wind you will appreciate the extra coverage the drawstrings provide. The armholes work well and are long enough to keep the camera from getting wet even in blowing rain. The clear back panel offers viewing of the camera screen and settings. I have read some other reviews that say this screen can discolor with age, but so far, I have not had any issues and I have shot in the elements a lot.   

The rain

I used the Altura Photo Professional Rain Cover on the deck of the cruise ship during our trip to Alaska. Between the salt spray and rain, I was certainly concerned about the camera staying dry (and especially free of salt) while I was up on deck. I shot for over an hour at a time and the camera made it through dry and working perfectly. The Altura Photo Professional Rain Cover is designed to protect and shield a small or professional DSLR camera and it certainly did the job well. I even had several people borrow it and use it on other smaller cameras when I was not using it. This little rain cover has had Sony, Nikon Fuji and everything else in it with no problems.

The snow

I was invited to shoot the winter games for the Special Olympics in Colorado, and the day of the event was not nice at all. With blowing snow, and an average temperature of 10 degrees, I decided to use the Altura Photo Professional Rain Cover to keep with camera free of melting snow. I think the cover helped to keep my hands a bit warmer than other times I have shot without a cover in blowing snow. The cover is made from high quality waterproof nylon, so it wasn’t insulating by any means, but the cover did seem to help maintain a bit of heat from my hands and make the long day shooting a bit more comfortable.

The sand dunes

The last harsh environment type I tried with the Altura Photo Professional Rain Cover was in the Great Sand Dunes in Colorado. I shot most of the afternoon and into the evening with blowing sand. There is nothing worse than getting sand in your lens or camera housing (well other than salt water of course). Maybe this cover was not intended for blowing sand as much as it was for rain, it did a great job. After the sunset, I walked back to the car and took the camera out of the cover and was pleasingly surprised that it was very free of sand and grit. I appreciated the cover protecting the top of my tripod as well. Now, if they only made one for the tripod legs so they didn’t get sand in them!

Conclusion

After a year with the Altura Photo Professional Rain Cover I can say I would happily recommend this to another photographer. The dual adjustable sleeves are great and have worked well with everyone who has used this cover. I also really like the protection from the full-length double zipper. The cover works well and provides access to camera controls whether hand holding or using a tripod. It is tough to get excited about a rain cover for your camera, but if I was going to, this would be the one to get excited about.

I love to hear from my readers! If you have questions about this or any review on this site, or If you have a product you would like us to review, drop me a message on Twitter or on the contact form here on the website. Have a great day!

Twitter: @EpicShit9


Get yours here: Godox AD200 200ws strobe

Photography gear is so expensive! Nearly every day I read on photo forums where people are looking for budget gear that performs as well as top rated equipment. Let’s put this in terms of cars, if you are looking for a car that drives as well as a Porsche and will retain nearly all its aftermarket value but costs 1/5 of the price, prepare yourself for disappointment. If you are looking for a suitable vehicle that will handle well in the snow and maintain much of its aftermarket price, a Subaru might be the ticket. Sure, it won’t have the power of the Porsche or the people checking you out on the street as you drive by, but it will get you where you need to go and be more than functional. Let’s be honest, who can afford a new Porsche anyway?

When I see people saying they like the way a Profoto strobe looks, but they are on a tight budget I always recommend the Godox AD200 or AD200 PRO line of strobes. There is a ton of information on these strobes, so rather than rehashing the same old material, I will focus (yeah get ready for some photo groaners) on some areas of confusion with these units and tell you about my experience shooting a body of work that has been exhibited many times.

Clearing the confusion

Whenever you do research on the Godox AD200/AD200 PRO line of strobes, you almost always see them mentioned with the Flashpoint eVOLV200, this is because they are the same unit with different branding. The camera store Adorama re-brands the Godox line of strobes to their Flashpoint brand. Same units, same batteries, (in most cases) same packaging and all the accessories work on the Godox or the Flashpoint units interchangeably. Which one is better? They both great, Godox has great customer support and a call will usually yield very fair returns or exchanges, which is also true for anything bought from Adorama under the Flashpoint brand. Since all the accessories fit either unit, I consider them interchangeable. I personally have the Flashpoint units but have friends with he Godox version and they are pretty much the same unit.

My other strobe is a Porsche

Full disclaimer, I usually shoot with Profoto gear, but sometimes it is just too bug and heavy to bring with me if I am doing a location shoot. I shoot for my work all over the United States, and I used to use pelican boxes and bring my big strobes with me everywhere, but eventually I got tired of the hassle and put together a smaller, lightweight location shooting setup which I centered around a couple of AD200s. The AD200 units are just a bit bigger than a standard flash and have four times the power and a lot more versatility.

Lighting differently

When putting together the components for the best cheap location shooting setup, many might be tempted to run towards a top rated flash like the Canon 600EX II series. I don’t personally like the camera-mounted strobes as much as I used to. I don’t think they have the versatility that a multifunction strobe like the AD200/eVOLVE200 has. The strobe comes with the Fresnel head, (like the head of a speedlight but doesn’t zoom) but for my work, I primarily use the included bare bulb head in a strip softbox or the 32-inch umbrella from Godox. The bare bulb head produces omnidirectional light and I have found it to work exceptionally well in a softbox or umbrella. If I am looking to have precise control over the direction of the light, when shooting product images or low key portraits I will use a strip softbox, otherwise portraits work well with the umbrella, giving a larger spread of light suitable for standard headshot type portraits.

The Fresnel head, in a softbox gives a stronger hotspot (like any standard camera mounted flash would) but is more efficient than the bare bulb head. When shooting on battery powered strobes, every consideration must be made to conserve power and squeak every shot out of a battery when on location. How does the AD200 do in terms of battery life? The documentation boasts 500 plus flashes at full power. Does it live up to the hype?

Battery Life

I know what you’re thinking, 500 full power flashes on a single charge with a battery this small seems inconceivable. When I first purchased the AD200 I was terrified the battery would give out the first time I took it as my key (primary) light on a location shoot. The first shoot I did with the AD200 was a low key Bodyscapes style portrait session, so I was not pushing as much power as you would with a standard portrait session. I ended up shooting around 50% power most of the day and after 1000 images I was done with the shoot and still had plenty of power left in the battery to keep going. I set myself up for success shooting lower power for the first shoot purposely and I was very happy with the results. The strobe performed very well, experiencing only one misfire during the shoot.

Feeling quite confident in the AD200 at this point, I scheduled a regular portrait shoot where I would be overpowering bright daytime indoor light. I didn’t buy a second battery for the AD200 as I was determined to run it out of power during a shoot. Would this relatively cheap strobe have enough power to last through a portrait session where I would be pushing the power capabilities of the unit? I setup with AD200 in a Godox S-type bracket which would give me the ability to attach a 32-inch Godox umbrella. Side note: I’m not a Godox fanboy or anything, I just happened to find all this Godox gear on sale at Amazon. Setting the exposure my ambient light, I fired up the AD200 in High Speed Sync (HSS) since at ISO 100 with an aperture of 5.6 (because I wanted the background to be somewhat in focus) I was at 1/800 shutter speed which put the unit in HSS mode. I shot all afternoon and ended up with just over 500 images for the day. With the ambient light, the AD200 spent most of the day in full power and after the shoot I still had enough power to shoot more.

I have shot with the unit many times since that day and I still have never bought a second battery and to this day I have never run out of power on a shoot. It appears Godox underestimates their battery capacity. I have since become very comfortable with the power consumption and have yet to run into a problem.

The only downside to the battery for this unit is that it does take a long time to charge to full. Not a big deal, and I haven’t ever had to wait for it to charge during a shoot. I suppose the first time this becomes a problem for me I will buy a second battery for the unit.  

Triggered

I paired the AD200 with the Godox Xpro-C TTL Wireless Flash Trigger for Canon (They have them for Nikon and Sony etc.). The trigger will shoot up to 1/8000s in HSS. The Godox Xpro-C will easily convert TTL settings to manual with the press of a button and has a large easy to read screen. I really like the slanted design and size of the display. If you shoot with a lot of strobes you will appreciate the 5 dedicated group buttons. The 11 customizable functions also make setting up the trigger just the way you like it a breeze. It works perfectly with all the Godox strobes I have tried it with including the on-camera style units. Since the Flashpoint branded strobes are all made by Godox, the Xpro-C worked perfectly with the other Flashpoint branded strobes I have as well.   

How does it drive?

Is the Godox AD200 and Xpro-C combination like shooting with a Profoto D2 or B10? No of course not. Is this setup perfectly serviceable and reliable? absolutely. I use this setup as my primary location setup and have had very few issues. It has never let me down on a shoot and I have yet to buy more batteries. If you are a machine gun shooter, then your mileage is going to vary. I would say I shoot at a normal pace and the AD200 has little issues recycling in time before the next shoot. My use scenario is low and normal key portraits and product photography. I don’t shoot sports, but I would say that the recycle time (the time the strobe needs to get ready for the next shot) would likely be a bit slow if you were looking to do images of dancers in motion. If you are looking for this type of recycle time the Profoto D2 is probably a better fit.  

I have shot with everything from cheap radio popper triggers cobbled with cord adapters onto 20-year-old speedotron strobes to current generation Profoto and Broncolor gear. The Godox AD200 and Xpro-C trigger setup is perfectly serviceable, and functions well. It isn’t going to recycle as fast as a Profoto B10, but then it doesn’t cost over $2000 either. If you are shooting fast, you might miss a shot here and there, but overall, it is a very nice rig to shoot with. I would recommend this setup to anyone.

Color

Here is another one of those things that other reviewers don’t mention. I am a stickler for color, and one reason to use a manufacturer like Profoto over Godox is consistency of light output. The Godox strobes (just like all other top rated cheap strobes) has a tendency to shift light color or power a bit over the course of your shoot. Some shots won’t be as bright, while others may be a bit off in terms of color (a bit). This effect isn’t a big deal and is something almost every budget strobe does. The effects of this color and brightness shift is easily countered by including a color checker in your first shot and using their software to adjust the color and brightness of all the shots in your session. This is not a bit deal for me. To date, I haven’t lost a single shot due to inconsistent light output. I use the AD200 in my professional work without problem. I only mention this point, because this is an honest review and if I were in your situation I would want to know. As a working professional, I don’t consider it any more a problem than I would using any other budget strobe.

Accessories

The Godox AD200 has been widely adopted in the photography community so there are a ton of options for accessories. Batteries, brackets gels, barn doors and a million other accessories are readily available for this little strobe. If you shoot weddings, this is a perfect strobe, because it is light and put out plenty of power to shoot in most situations. I especially like that there are a few different heads available now, such as the LED head which turns the AD200 into a continuous light for video and a round head making the light output look similar to the Profoto A1. This really is a great little versatile strobe.

Conclusion    

I reviewed the AD200 and Xpro trigger because this is the gear I use in my work. There are a million and one YouTube videos and written reviews for these units, but not all of them are totally honest about real-world experiences. The AD200 is a great alternative whether you are just getting started or if you are a seasoned pro looking for a reliable second or location kit. I love that I can throw this strobe into my camera bag with all my lenses and have a perfectly serviceable location shooting setup that is light and has enough power for portraits and plenty of battery life.

I love to hear from my readers! If you have questions about this or any review on this site, or If you have a product you would like us to review, drop me a message on Twitter or on the contact form here on the website. Have a great day!

Twitter: @EpicShit9

Links:


Get yours here: Powerbeats3 Wireless Earphones

A few months ago, my generation 1 Powerbeats finally died, when I was not using them, I kept them in their travel case and they served me well for years. I wanted to stay with Powerbeats so I upgraded to the Powerbeats3 Wireless Earphones, I was happy because the new beats added the cool new Apple W1 Headphone Chip, which makes pairing as easy as turning on your beats next to a compatible device like an iPhone or iPad. I was excited about the reported 12 hours of listening time, and that this generation would be sweat resistant. Did they live up to my expectations? Read on…

Price

Beats are high definition Earphones and have a premium price attached just like all Apple products. (beats electronics are now owned by Apple in case you were unaware.) there are other earphones available for much cheaper but frankly, the sound quality of the beats outshines most budget earphones. I recently found the Powerbeats3 wireless earphones on sale at Amazon for $79.99. This lower price reflects the release of the newest version of Powerbeats which are in the 149-dollar range. The biggest difference between these and the newest version is an additional three hours of battery life. This wasn’t a big deal because of a cool new feature in the Powerbeats3 (more on this in a moment).

Pairing

I tested the Powerbeats3 Wireless Earphones with my iPhone X and iPad Pro, and found the pairing seamless. Both of my devices have the chips inside that talk with the new W1 chip in the Powerbeats3 and after switching on the Earphones they were immediately displayed on my iPhone. I clicked connect and they displayed the remaining battery and I was off to the races. My understanding is that the new Class 1 Bluetooth in the Powerbeats3 make pairing easier and more stable, and this was certainly my experience. To pair with another device, all you need to do is hold down the power button for a few seconds and they will be displayed on the screen of the nearest device. This made switching from my iPhone to my iPad quick and easy. I liked that you are no longer required to go into the settings and choose “forget this device” then repair each time. Being able to switch between devices easily is worth the upgrade price for me alone.

I ran with the iPhone in my pocket, sitting across the room and sitting in my backpack across the room and never lost connection or experienced static. In my previous generation earphones, I could not run with my iPhone in a backpack – I would always lose connection. Whether it is the new Bluetooth chip or the W1 chip, I have found that it all works better than previous generations hands down.

Performance

Beats headphones have a very specific sound, they are heavier on midrange and bass and if you like this sound profile you will not be disappointed with these earphones. I have been using these earphones for a few months now and have found them to sound great (like my old beats did) and have all the same features as my old beloved generation 1 earphones. These get loud and have plenty of bass. Be sure to follow the fit guide included so you choose the proper size ear tips. The better the fit in your ear canal, the better the bass response will be.  The included three ear tips will fit almost any size ear canal.

I was also impressed with the sound of the upgraded microphone when using the phone (I had a couple people use the earphones and talk to me on it so I could hear how it sounded). The addition of the new W1 chip also works perfectly with “hey siri”. When running on the treadmill you can say “hey siri” and then “read messages” after the beep to have your phone read your text messages while you run uninterrupted. On previous generations of the beats you had to hold the middle button on the control segment of the earphones to activate siri.

Battery Life

This is where the Powerbeats3 shine. It was always tough waiting for my first-generation earphones to charge, but with the new Fast Fuel technology, these earphones get an hour of use with just five minutes of charge time. I can’t tell you how many times I have forgotten to charge my earphones when I was headed to the gym! With the new Powerbeats3 I can charge my earphones on the way to the gym with a Powerbank (like you use to charge a phone). If I plug them in on the way to the gym, I always have more than enough juice to last my whole two-hour workout. This is such a convenient feature.

With the 12-hour battery life, I can easily get five two-hour workouts in on one full charge. I have found in my testing that they don’t lose a lot of power while they are in standby mode between uses. How would I rate the Powergbeats 3 battery life? Excellent.    

Negatives

If you are an audiophile, you probably won’t like the sound of these earphones, but this goes along with all beats. I personally like the sound of these earphones as well as the studio line of headphones. The only other negative I have is the carry case. The case that comes included with present generation beats is made of silicone and is not as sturdy as the cloth zippered ones that came with previous generations of the earphones. Not a big deal, and certainly not a deal breaker for me. I think the positives of these earphones way outweigh the mediocre carry case. I’m not going to include the price as a negative because if you are getting into these earphones you are already aware of the price.

Conclusion

Would I buy them again? Without hesitation. Would I recommend these to my best friend? Yes. I have been using the Powerbeats3 wireless earphones for a few months now and I love them. When my older generation earphones died, I tried a few other budget earphones but ended up running back to the beats brand like a moth to a flame.

Get yours here: Powerbeats3 Wireless Earphones